
As an Amazon Associate we earn from qualifying purchases.
In the world of online sales, product images are essential to draw in the customer—but bad product images can just send them clicking the back button. A good product photo will have all of the elements of good photography in general, like proper exposure and lighting. But product photography also involves more than just a few general concepts in order to work in a way that really represents the product.
To capture images that sell, all of the elements in the photo need work hand-in-hand to highlight the product in the best light possible—both literately and figuratively. It’s easy to spend a few hundred dollars or even a few thousand on getting all the materials for a product shoot, but it’s also possible to take good pictures on a miniscule budget, or, depending on what you already have on hand, even for free.
Having a good product photography camera helps, but even a good camera can take bad pictures if you don’t know how to take advantage of all the features. Here are ten product photography tips that will help your images to sell, no matter what your budget is (or what camera you are using).
Contents
1. Stick With a Simple Background
Don’t get so carried away with taking good product photos that you forget what the photos are all about—the product. Keep backgrounds simple, choosing something that will draw attention to the product instead of being so busy it distracts from it. Make sure your backdrop contrasts with your product, it should be a much different color than the actual product.

Simple white backgrounds work great, but you can get more creative if you like, just remember to use something simple. Wood can work great, but so can plain painted walls in your own home. Patterns are okay if they are simple—avoid busy patterns. Also take care to avoid any surfaces that are shiny, as odd shine in the background can also be distracting.
DIY Product Photography Backdrops
- White: Try a foam board, a white roll of paper or a white sheet.
- Wood: Use rescued barnwood (check Craigslist or ask around), a wood table, or for larger items, wood paneling from a home improvement store.
- Fabric: Picking up a yard of fabric at a craft store works great for small to medium sized items and is relatively inexpensive, just avoid busy textures and patterns.
- Free: A blank wall in your house; a plain curtain, tablecloth or sheet you already own.
2. Aim For Soft Lighting
Lighting in photography is classified as either hard or soft. Hard light has very dark shadows, while soft light only has very light shadows. Soft light works best for product photography, since hard light can obscure part of the item in shadow. Hard light also creates a feeling of drama, and that’s not likely something you want to portray with your products.
How do you find soft light for product photography? It’s easier than it sounds. Normal sunlight is hard, but on an overcast day, the clouds filter the light, making it soft. Indirect sunlight through a window is also softer than direct sunlight.
The most inexpensive way to light a product photography session is to set up by a large window. If you happen to be working on a very bright sunny day, your shadows might be a little too harsh yet—if that’s the case, hang a sheer white curtain over the window. The thin curtain will filter the light without blocking all of it, making the shadows much lighter. If on the other hand, you need more light, use a reflector.
You can buy a reflector for about $30, or white foam board or cardboard covered in tin foil will also reflect back light. Use the reflector to bounce light back on the product, experimenting with different angles to see what looks best for your particular product. While you can light product photography for free with some sunshine, if you take a lot of images, you may want to invest in a light tent.
These are a backdrop and lighting set in one, designed specifically for product photography so the light is always soft. They’re nice to leave set-up in an office for someone who owns an online store and is frequently snapping product photos, plus you can shoot no matter how dark it is outside. Studio strobe lights with an umbrella diffuser also work, and the budget models are fine for most product photography applications.
3. Use a Tripod
The beauty of product photography is that you are shooting still life, so you don’t need a lot of light. But you will need a tripod or something steady to rest the camera on, especially if you opt to light the shot with just sunshine. Using a tripod will allow you to use a low ISO setting for the best image quality (more on that a little later) without any blur from camera shake.
When picking up a tripod for product photography, however, you don’t have to spend a couple hundred dollars on a top-ranked model. Tabletop tripods work good for product photography (unless of course the product is too large to sit on a table) and you can pick one up for around $20 or spend a bit more for a nicer model. If you don’t plan to shoot at a table, you can get a full height tripod.
Budget models are okay for product photography if you’re inside (where there’s no wind) and can use the timer feature on the camera so you don’t shake the tripod when you hit the shutter release button. Keep in mind that budget tripods don’t last as long, so again, the more often you take product photos, the more you’ll want to invest.
4. Use Aperture Priority Mode
If your camera has manual modes, use aperture-priority (A or AV on the mode dial) for your product photography (if you don’t have manual modes, skip the next two paragraphs). If you’ve shoot with manual mode before, go ahead and use that, but if you’re new to using manual modes, read our guide to using manual modes here, then use the simpler aperture priority mode to avoid being overwhelmed. Once in aperture priority mode, the control dial will adjust the aperture (if you’re not sure how to adjust the aperture on your particular camera, check the manual).
In this mode, you don’t have to worry about also setting the shutter speed, the camera does it for you. You should use an aperture that allows you to keep the entire object in focus—so your settings will vary a bit based on what you are shooting and even your camera. Remember smaller numbers mean more of the image is out of focus.
Apertures like f1.8 are typically too small for product shots. An f/8 or f/11 aperture typically works well for products, but if you have a camera with a smaller sensor size or are shooting a smaller object, you may be able to use a smaller f-number. Take a few shots, then zoom in on the product on your camera’s LCD screen. If the product appears out of focus on the edges, increase the f-number.
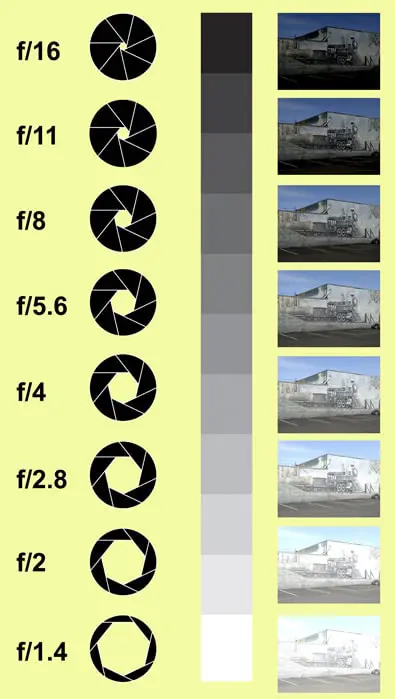
Aperture Comparison (Source)
Why not just start at the highest f-number to keep the entire product in focus then? High aperture settings like f/22 can leave even the background in focus, which draws attention away from the product. Use an aperture that will keep the product in focus, but will also result in a soft background—that’s why the middle ground around f/8 and f/11 works well.
If your background is still looking too sharp, move the product farther away from the background—this will help throw the background out of focus without adjusting the aperture. While it’s best to use a camera with manual modes, you can still take product photos with a point-and-shoot. Use auto mode, or try the portrait scene mode.
If your camera offers the ability to adjust exposure compensation on auto, you’ll likely want to turn the EV up by a setting or two, since most automated modes tend to underexpose product shots. To keep the background soft without the ability to adjust your settings manually, move the product as far away from the background as you can.
5. Use Single Point Autofocus
If you are taking a picture of a single product, you’ll want to adjust your autofocus mode. Head into the camera’s menu and look for something called the AF-Area Mode (this varies by model, so if you don’t see it, check the camera’s manual. All modern DSLRs will have this mode, but some point-and-shoots don’t have this feature.) Change the AF-Area Mode to Single Point (Nikon) or Manual AF Point (Canon).
Once you’ve changed the AF-Area mode, you can choose where you want the camera to focus by moving the autofocus point (this is usually done with the same buttons that navigate the menu, or through a touchscreen). Move that point over your product and shoot. Using single point autofocus increases the chances the object will be in focus, instead of relying on the camera to choose the focus point for you.
6. Use a Low ISO
Since product photography involves shooting a still object with a tripod, it’s a bit easier to get well-lit images even indoors without extra equipment. Choose the lowest ISO setting that your camera offers—typically ISO 100. High ISOs introduce grain into the image, but allow you to use faster shutter speeds in limited light.
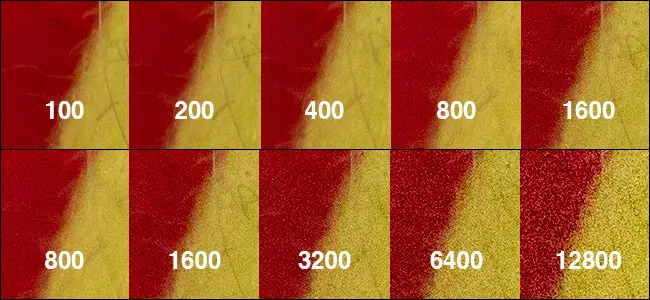
ISO compared (Source)
But, in product photography, the subject isn’t moving, and with a tripod the camera isn’t moving either—so shutter speed doesn’t really matter in this scenario. Using a low ISO will give you the best image quality for still life photography—just remember you may need to turn it back up (or back to auto) when you take the camera off the tripod.
7. Check Your White Balance
Auto white balance works well most of the time, but if your images have a blue or yellow tint to them, you’ll want to adjust your white balance. You can adjust the white balance by choosing the setting that’s named after the type of light you are using—if you are shooting with window light, choose shade, or choose based on the type of lightbulb you have. For more exact results, use the custom white balance setting—you’ll need to take a picture of something white to use this setting, but even a sheet of printer paper will work.
8. If You Have RAW, Use It
RAW files offer more control over the editing process, so if you have a camera that’s equipped with RAW (modern DSLRs, mirrorless, and even some compacts have this feature) and some basic editing software, use it. RAW files make it easy to adjust the exposure and white balance, so if you didn’t quite get it right while shooting, you can usually get it perfect on the computer.
If you don’t have a photo editing program, you can even try out some of the free options that handle RAW files, like Picasa and UFRaw. While they don’t stand up to expensive programs like Photoshop and Lightroom, they’ll make a big difference over simply shooting JPEGs.
9. For Tiny Products, Use Macro Mode
Most products can be shot without switching to macro mode, but small items like a pair of earrings, for example, are often better shot in macro mode. The macro mode tells the camera to focus on an object that is closer to the camera’s lens than normal and helps to get small objects sharp. Some cameras have a shortcut to this mode (it often looks like a small flower), while others have the option inside the camera menu, or sometimes, as a scene mode.
10. Utilize the Rule of Thirds
Amateur photographers, by default, tend to place the subject in the center of the frame when composing the shot. While that can work for some shots, don’t just automatically center your product in the photo. Instead, consider the rule of thirds. Imagine the image is divided into threes and place the product on where one of those dividing lines would be.
Placing the product off-center draws the eye more to the product, while leaving visually appealing negative space. A good product photo can often make or break an online sale—or any type of sale that’s not in person, for that matter. But it is possible to take your own product photos and still get solid results with a little understanding of the basics and some practice.
Keep our ten product photography tips in mind as you prep for the shot and as you shot, and you’ll be on your way to better product photos—and probably more sales.