As an Amazon Associate we earn from qualifying purchases.
A camera’s auto and scene settings often result in great shots—but not always. There’s that sports photo that was still too blurred, that portrait that was too dark, and that indoor action shot that was both blurred and dark. Ultimately, for the most image control, you’ll have to leave auto and scene modes behind in exchange for manual settings.
Not every digital camera has the option to manually adjust settings, but many do. DSLRs, mirrorless, and advanced compacts nearly always include manual modes; some zoom models also include the feature. If you bought a $400 advanced compact, a $500 mirrorless package, a $600 DSLR—you aren’t taking full advantage of your investment until you learn how to use the manual modes.
To truly take control of your photos, there’s a few basic photography concepts to grasp, including shutter speed, aperture and ISO, before you start using programmed, shutter priority, aperture priority and full manual modes.
Contents
The Basics: Shutter Speed
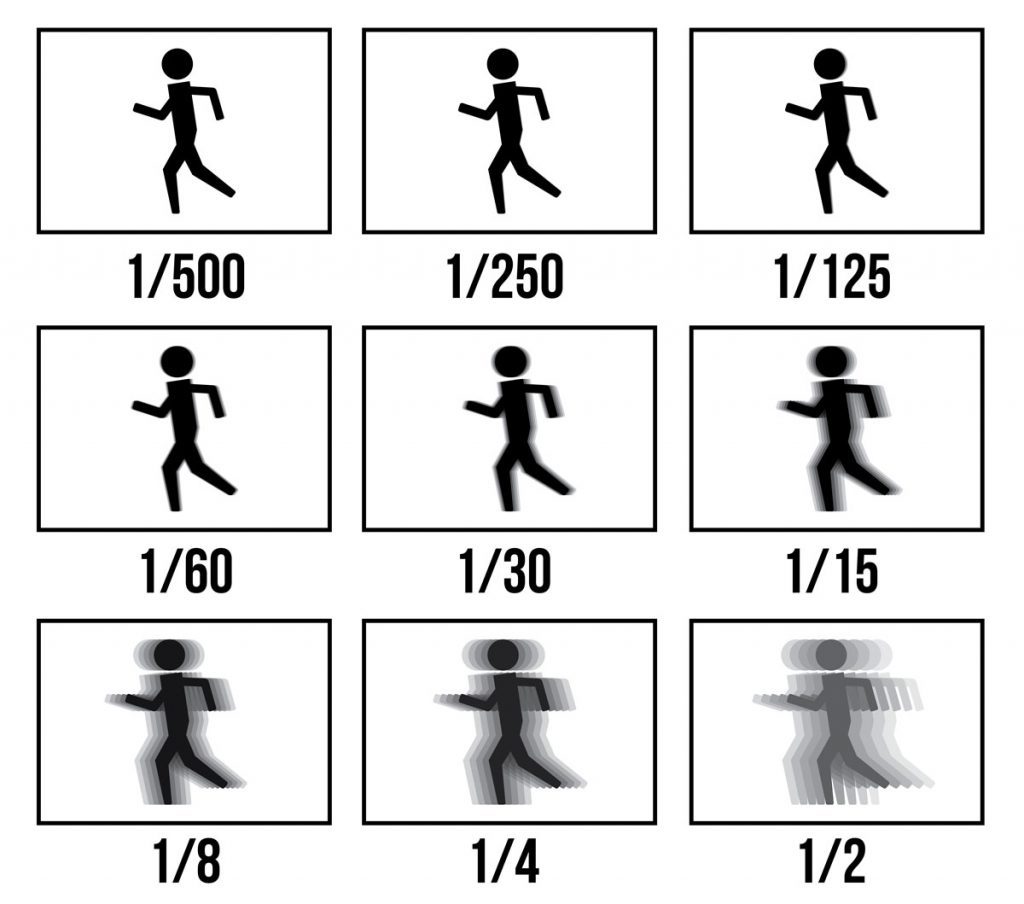
When light hits a digital camera’s sensor, an image is recorded. The camera’s shutter is like a door that opens and closes to let in that light—the longer the “door” is open, the more light that hits the sensor. But, movement during the time that the “door” is open also results in blur.
Shutter speeds are written in seconds, often as fractions. The smaller the number is, the faster the shutter is and vice versa. Speeds typically range from 30s to 1/8000, depending on the camera model. The “bulb” speed is when the shutter stays open until the photographer hits the shutter release button a second time.

Slow shutter speeds let in more light and are generally used for low lighting conditions where there isn’t much movement. Slower shutter speeds are also great for creating different motion blur effects. A busy highway at night becomes a line of light, water becomes blurred and soft in a waterfall, people passing by become a blur at slow shutter speeds. Slower shutter speeds generally require a tripod, otherwise small handshakes result in unwanted blur.
Fast shutter speeds freeze the action better and are generally used for action shots with sufficient lighting. Faster shutter speeds mean the athlete can appear frozen in mid-air without blur. Shorter speeds, however, let in less light, so the speed needs to be set low enough not to be too dark for the conditions.
The Basics: Aperture
The camera’s aperture controls the amount of light reaching the sensor not through exposure times, but through how large or small the opening is. The aperture is measured in f-stops. The larger the f-stop number is, the smaller the opening is, meaning less light is allowed to pass through. Don’t worry if you aren’t good with remembering numbers, many cameras with an adjustable aperture show you with a graphic how the opening changes; just remember a larger opening means more light.
Along with controlling the amount of light, the aperture also controls the depth of field—which, simply put, means the amount of blur in the background. An image with a narrow depth of field will have one item or area in focus, while everything else is out of focus. Narrow depth of fields are great for macro shots and portraits. In a wide depth of field, pretty much the entire picture is in focus. Wide depth of fields are excellent for landscape photography.
The Basics: ISO
There’s one more factor to consider when using manual modes: the ISO or the light sensitivity of the camera. Higher ISOs like 3200 allow for more light and are better for low lighting conditions. However, high ISO result in noise, or a grainy texture to the images. If the lighting is sufficient, choose a lower ISO for less noise. If the photos is too dim in the desired aperture and shutter settings, a higher ISO can be used.

Many camera models use the menu or a shortcut menu to adjust the ISO. Some cameras have shortcut keys for adjusting the ISO. If you aren’t sure where to set it, simply use the auto ISO setting.
Manual Modes: Programmed (P)
Shutter speed, aperture, ISO—there’s a lot to remember when using manual modes, but the good news is that you don’t have to learn everything all at once. Three of the four manual modes still have the camera choosing some of the elements for you. The manual mode where the camera still chooses most of the settings is called Programmed (marked by the initial P and sometimes called Programmed Auto).
Programmed mode varies slightly between different camera models. Some point and shoots will have a “Programmed” Auto, but only let the user adjust things like ISO and white balance. The true Programmed mode lets the user choose aperture and shutter speed in sets. In other words, the aperture and shutter speed change together.
To use Programmed, set the camera’s mode dial to P (some models require using the menu to change to this setting; if you aren’t sure, consult the manual). Most cameras with manual modes will have a dial to adjust manual settings (if not, it may be in the menu options), simple rotate the dial until the screen shows the desired settings.
When learning how to use manual modes, use programmed auto to snap photos at varying pairs of settings, then go back through your photos to see how the various settings changed the image.
Manual Modes: Shutter Priority (S or Tv)
As the name suggests, Shutter Priority (indicated by S or Tv) mode is used when the shutter speed is the most important aspect to the shot. The user will select the shutter speed (along with ISO and other settings), but the camera will select the best aperture. Shutter priority mode is great for action or for purposely adding some blur with slower speeds.

To use Shutter Priority, turn the mode dial to “S” or “Tv” (or in some models, locate it in the menu). Most models then use the control wheel or the arrow buttons to adjust the speed. Select a fast shutter speed for action or a slow one for blurring moving objects. Take a few pictures on the setting, then preview the shots on the screen and make adjustments as needed.
Manual Modes: Aperture Priority (A or Av)
Similar to Shutter Priority, Aperture Priority is used when the lens opening is the most important aspect of the shot. This mode, where the user selects the aperture and other settings are automatic, is great for getting the right depth of field or letting in the right amount of light.
Turn the mode dial to A or Av or find the Aperture Priority mode in the menu, depending on what camera model you have. The control wheel (if there is one) adjusts the aperture; if there isn’t a control wheel, try the arrow buttons or consult your camera manual.
Manual Modes: Full Manual (M)
Full manual mode gives the photographer control of every possible aspect, including shutter speed, aperture and ISO. Find the M icon on the mode dial or locate the manual mode in the camera menu. Cameras with a control wheel will generally have either shutter speed or aperture automatically controlled by the wheel, then pushing or holding the function button, often denoted as Fn, will change the function of the wheel to the other option.
For example, on the Nikon 1 J3, manual mode is selected by choosing the creative option on the mode dial, then manual from the menu. The control ring (which doubles as navigation buttons) will adjust one option, while the screen indicates hitting the right arrow button will switch the control ring to the other option.
Manual Mode: Tips & Tricks
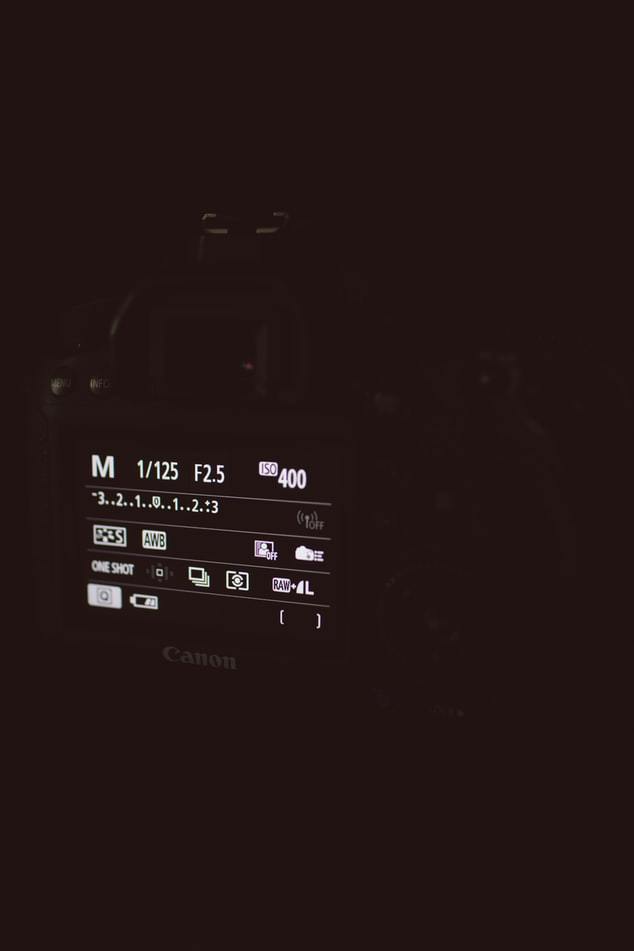
Using manual modes doesn’t mean there has to be a lot of guesswork involved. In A, S, and M modes, the screen or viewfinder will show a exposure value meter. In general, adjust the combination of settings so that the indicator is in the middle of the meter.
If the photo needs to be a little overexposed, adjust so the indicator is on the left side of the meter and vice versa. The exposure meter helps indicate if the combination of aperture, shutter and ISO are right for the light that’s available.
When using manual modes, it’s also a good idea to take a test shot first, then preview the image on the screen to see if you have the desired effect. Be extra attentive when using manual modes outdoors; a single cloud can change the lighting conditions, making the settings that worked great a few moments ago not so great anymore.
Learning how to use manual modes can be frustrating, so take some time to head someplace nice to practice. Take photos, preview them and keep adjusting the settings. After a bit of practice, the basics of manual modes are easily mastered.
Manual modes are a must for the photographer that wants to capture moments in the best settings possible for the conditions. Digital camera manual modes allow the user to adjust aperture, shutter speed and ISO to perfect the lighting or to create special effects.
