
As an Amazon Associate we earn from qualifying purchases.
Focus stacking is a technique used to increase the shallow depth-of-field effect (sharp foreground, soft background) in a photograph. At normal shooting distances and magnifications, a shallow depth of field can be achieved by simply taking the lens down a few stops.
But for macro photography, where objects appear larger than they do in real life, images will look much more striking by merging multiple photographs together, like this fly:
Getting Started: Raw Photos
Depth of field at these magnifications is measured on the order of millimeters rather than inches, and even the tiniest movements by the photographer can throw the subject entirely out of focus.
Using a tripod is probably the easiest solution and will yield the best results for stacking, but I find it too limiting to be useful while I’m hunting for insects. Instead, practice good hand-holding, controlled breathing techniques (the same basic principles as marksmen use), and keep shooting long after you think you have some winners.
What you want to be aiming for is a good spread of photographs that together will yield an in-focus subject. For example, here’s a selection of images I shot and then arranged afterward to gradually reveal the entire fly’s body.
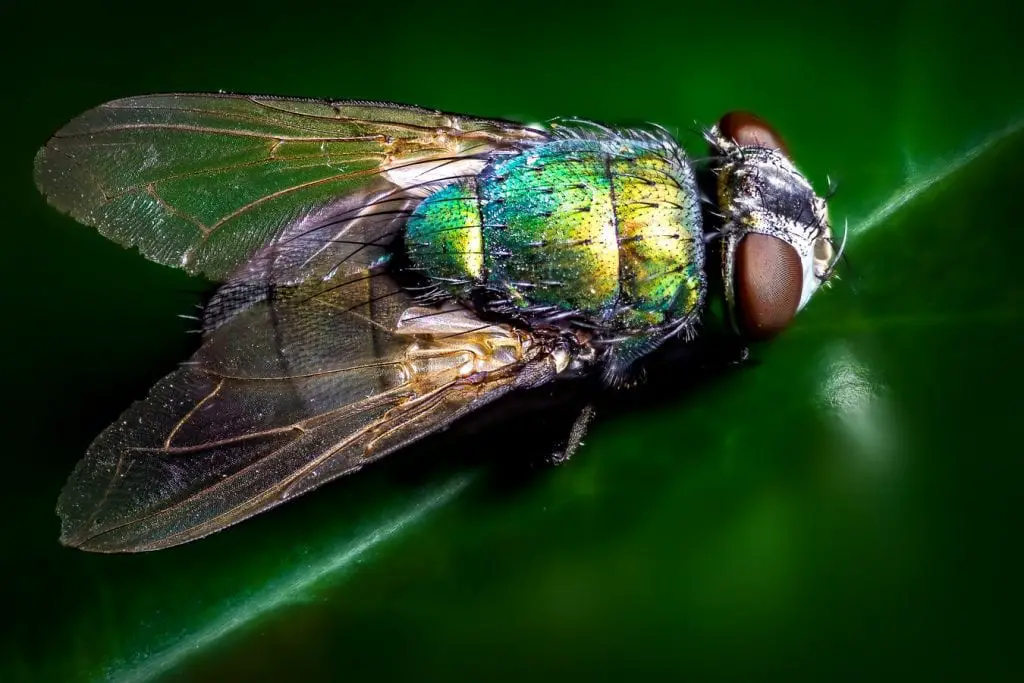
The first image (top-left) has part of the closest wing in focus, the next (top-middle, etc.) a little more and the beginning of the body, the third reaches the forward-most eye, the fourth encompasses the middle of the body, and so on.
Very importantly, notice how they aren’t all aligned perfectly, nor do they even share the same exposure; Photoshop CS5 can solve these issues during the focus stacking process.
For those who are curious, these were all shot at just over 2:1 (twice life-sized) using a reversed 35mm lens set at f11 and a short extension tube (all of those topics could be articles on their own, but the principles and techniques apply to any shooting rig, so we’ll stay focused on the stacking process).
Getting It Done: Stacking in Photoshop
Feel free to download the samples above, and follow along with the following steps. Load all the images into Photoshop in one document, as layers. The order shouldn’t matter but for the sake of organization, I sort them in Lightroom first before sending them over to Photoshop.
Once they’re all in one document, select them all and go to Edit > Auto-Align Layers. This will bring up a dialogue box with a variety of options for how you’d like to align them. Generally Auto works just fine. I also usually leave “Vignette Removal” and “Geometric Distortion” unchecked because we’ll be blending the images in the next step anyway.
Give it some time: This step is taxing for the computer. I’m using six images, which is probably at the upper end of what is feasible, so fewer images should process faster.
And Voila! Your final stacked image should appear. In the Layers palette you should see something like this:
You can see the amount of masking Photoshop needs to do to align the planes of focus, and clicking on the eyes will let you see what parts of each image go into making the final product.
If you see some problems in the image (for example the antenna at the back top of the fly’s head isn’t aligned properly), be sure to create a New Layer from Visible before attempting to fix it. Editing with the masks in place is next to impossible. Also, remember to crop out those unsightly edges!
There are other programs that do the job a bit better than Photoshop, such as Helicon Focus or the free CombineZ, so give those a look too if you don’t already own CS5.
While macro work benefits the most from focus stacking, the technique could be handy whenever you need to increase the depth of field or even selectively focus on two objects in a single frame. Let me know if you have any questions below!