
As an Amazon Associate we earn from qualifying purchases.
Lighting a dark place is the primary and most obvious use for a camera flash, but it is certainly not the only one. Fill flash is a quick and easy tool to drastically improve backlit or harsh lighting conditions. It’s a boon for outdoor portraits, where the sun doesn’t always cooperate.
What is Fill Flash?
The technique is called fill flash because it “fills” the shadowed areas of your subject. If there’s no way to avoid taking photos in direct sunlight, force the camera’s flash to brighten dramatic shadows and add a little catch light to the eyes.
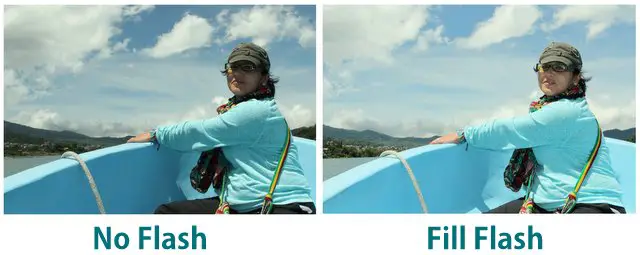
The first example (Ex. 1) to the right shows a typical result on a sunny day. Pointing the couple directly into the sun would lead to squinting, so the only option was to let the sun fall across their faces, creating deep shadows around the eyes and under the nose. You can see that turning on the flash (Ex. 2) vastly improved the photo; while the shadows are still there (one flash will never overpower the sun), they are much reduced and the eyes have been filled in.
While this first example was taken with a DSLR and on-camera flashgun, similar results can be reached with an average point-and-shoot. While a pretty extreme torture test for any camera, you can see that my compact camera first attempted to compensate for the backlighting by underexposing the foreground (Ex. 3), resulting in both a dark subject and blown-out highlights. The fill flash brightened their faces without changing the background exposure (Ex. 4).
Fine-Tuning the Fill Flash
While it’s possible to achieve good results with either a dSLR or a consumer compact, there are some caveats that make the dSLR a better choice for fill flash. The tiny and relatively weak flash on a compact camera has a very hard time competing with the sun, which means your point-and-shoot wont fill in those dark shadows nearly as well as a dSLR with an external flash.
This problem is exacerbated by the short shutter speeds necessary to produce an accurate exposure in such bright conditions. Both dSLRs and compacts are limited by a flash sync speed, generally around 1/200 second. Faster than that, the flash resorts to high-speed sync (HSS), a much weaker continuous strobe.
The first sample above (Ex. 1) was shot at 1/640 second using HSS; a compact’s weaker flash would not have been able to produce that result. Do note that you’ll need to change the camera’s flash setting to HSS in order for it to work (that is, if your camera even has HSS — lower-end compacts usually don’t).
Another great thing about DSLRs and many higher-end compacts and superzooms is that you can manually change the flash’s output in EV steps. These last three examples are taken without flash (Ex. 5), with flash (Ex. 6), and with flash at -1EV (Ex. 7). The reduced-flash version is the most natural of the three. There are fewer hotspots on the subjects’ faces and it simply does not look as unnaturally “flashed”.
If your camera has flash exposure compensation, I highly recommend keeping it at -1EV or even lower while using fill flash. While all the examples here have dealt with portraiture fill flash on a bright sunny day — it’s the most obvious use of the technique — it can be useful whenever a foreground subject needs a little more illumination.
Imagine popping the flash to further accentuate a foreground object in a landscape, or even using multiple strobes to actually overpower the sun and darken a bright sunny day. Remember that the more control over light you have, the closer your photographs will match what you envision. Fill flash is just one more tool that will help you on the way.